
Transcribed from Allyria's Aion 2 Ranger Guide (Global Edition, PvE, updated 06.09.2026) as a demonstration of this authoring system. The advice, priorities and numbers are hers.
About this guide

Written for the Global release version of Aion 2. Class balance is aligned to the current TW patch, since that is most likely what we inherit at launch.
That is why several chapters are split in two: "Global release" tells you what to expect and what matters on day one, and the TW half shows how the same system looks today, so you can plan long-term instead of being surprised later.
This guide expects a basic understanding of the game, the class and its systems. You have reached level 45, collected feathers, and so on. It is based on my own experience plus information collected from TW/KR servers and player feedback.
PvE only: I am not deeply into PvP currently, though a dedicated PvP part may follow.
Chapter 1 · Skills and Specialties
Skill balance carries over from the current TW patch, so these priorities apply from day one at Global. Dump your points by tier.
This many skills at +20 is hard or not possible in Season 1, because we have fewer Arcana cards, but it is where you should aim long-term.
1.1 Active skill levels
| Skill | min | Finish at | Why | |
|---|---|---|---|---|
 Gale Arrow Gale Arrow |
20 | ★★★★★ | ||
 Deadshot Deadshot |
20 | ★★★★★ | ||
 Drill Dart Drill Dart |
20 | ★★★★★ | ||
 Tempest Shot Tempest Shot |
20 | ★★★★★ | ||
 Snipe Snipe |
20 | ★★★★★ | ||
 Burst Arrow Burst Arrow |
16 | ★★★★ | ||
 Arrow Scattershot Arrow Scattershot |
16 | ★★★★ | ||
 Marking Shot Marking Shot |
16 | ★★★★ | ||
 Explosion Trap Explosion Trap |
12 | ★★★ | ||
 Snare Shot Snare Shot |
12 | ★★★ | ||
 Suppressing Arrow Suppressing Arrow |
★ | |||
 Defiance Defiance |
★ |
1.2 Passive skill levels
| SS |  Focused Eye
 and Hunter's Resolve are in a completely different league from everything else. Dump everything into these two first, then spread. Focused Eye
Focused Eye and Hunter's Resolve are in a completely different league from everything else. Dump everything into these two first, then spread. |
|
| SS |  Hunter's Resolve Hunter's Resolve
|
|
| S |  Hunter's Soul
Your focus afterwards, for optimal damage. Hunter's Soul
Your focus afterwards, for optimal damage. |
|
| A |  Vigilant Eye Vigilant Eye
|
|
| A |  Rooting Eye Rooting Eye
|
|
| A |  Melee Fire Melee Fire
|
|
| A |  Concentrated Fire Concentrated Fire
|
|
| B |  Revitalization Contract Revitalization Contract
|
|
| B |  Wind Vigor Wind Vigor
|
|
| B |  Unyielding Resolve Unyielding Resolve
|
1.3 Break bars
Some boss monsters have a break bar right under their health bar. This sometimes needs to be destroyed very fast or the group gets nuked. Transcendence 1, Atiel, for example.
Every class has Break Values on its skills. If you know a boss needs a break, save them for when the bar opens. Arrow Storm provides the biggest Break Value of all Ranger skills.
Break Value overview
| 1 |  Arrow Storm Arrow Storm
|
50 |
| 2 |  Explosive Arrow Explosive Arrow
|
20 |
| 3 |  Griffon Arrow Griffon Arrow
|
20 |
| 4 | Burst Arrow
|
15 |
| 5 | Deadshot
10–16 depending on the stage. |
10 |
| 6 | Suppressing Arrow
|
10 |
| 7 | Gale Arrow
|
10 |
| 8 | Explosion Trap
|
10 |
| 9 | Snare Shot
|
10 |
| 10 | Marking Shot
|
7 |
| 11 | Drill Dart
|
5 |
| 12 | Tempest Shot
|
1 |
Skills with "chance to reset after 25%" are worth it early on, but the trait gets worse over time with more Attack Speed and CDR. At some point it can be worth replacing without hurting damage by a lot. Early on it is not recommended.
1.4 Skill Traits
| Skill | Lv | Nodes | Effect |
|---|---|---|---|
| Snipe |
Orange › Red › Yellow | If you struggle with HP you can go with 0.7% HP Regen instead of Multi-hit %. | |
| Tempest Shot |
Red › Blue › Yellow | ||
| Snare Shot |
Yellow › Blue › Red | ||
| Marking Shot |
Green › Yellow › Red | ||
| Drill Dart |
Red › Yellow › Orange | If you struggle with HP you can go with 3% HP Regen instead of Multi-hit. | |
| Arrow Scattershot |
Red › Orange › Green | ||
| Gale Arrow |
Orange › Red › Yellow | +5s duration is only a thing early on, in combination with increased Combat Speed. After reaching level 16, switch towards -10s cooldown: later into the game you reach 100% uptime without +5s duration, and even early on you benefit more from the cooldown. | |
| Explosion Trap |
Green › Yellow › Red | ||
| Burst Arrow |
Yellow › Red › Orange | If you struggle with HP you can go with 10% HP Regen instead of +20% damage. | |
| Suppressing Arrow |
Yellow › Green | ||
| Deadshot |
Blue › Yellow › Red | The Orange trait is nice for PvP; in PvE it is total trash with a geared character. However, early in Season 1 before we gain good Multi %, it might be better than Red. | |
| Defiance |
Red › Yellow › Blue |
Chapter 2 · Stigma Skills
Skill points are slow to get. Farming inside the Abyss at 25k AP per skill point remains the main source. The stigma system itself changes shape after launch.
2.1 Taiwan currently
KR/TWOn TW the system has grown with the level 50 patch: 6 stigma slots instead of 4, max level 25, and a new Ranger stigma, Supporting Fire, that is now part of the core.
Only 3 stigmas can be at level 25 currently, and the prerequisite is owning 8 stigmas at level 20, since every level-20 stigma gives 1 stigma point to upgrade beyond 20. You cannot rush three stigmas to 25. The 8×20 requirement is a large, unavoidable investment in stigmas you may never slot. Budget for it. Choose your stigmas as you wish; we can most likely change without spending in-game currency, since this was a QoL change on TW. Unsure if Global gets this system directly at launch.
The three to ALWAYS pick for PvE once introduced: Bow of Blessing, Vaizel's Authority, Supporting Fire.
2.2 At Global release
Global| Essential |  Vaizel's Authority · buffMain buff. Vaizel's Authority · buffMain buff. |
|
| Essential |  Bow of Blessing · buffSecondary buff. Bow of Blessing · buffSecondary buff. |
|
| Essential | Explosive Arrow · damageDPS. |
|
| Situational | Arrow Storm · breakFlex slot: break and AoE. |
|
| Situational | Griffon Arrow · damageFlex slot: DoT and DPS. |
|
| Situational |  Mother Nature's Breath · survivabilityFlex slot: survivability. Mother Nature's Breath · survivabilityFlex slot: survivability. |
Vaizel's Authority + Bow of Blessing + Explosive ArrowExpect the earlier stigma system at launch: three fixed picks and one flex slot.
Bow of Blessing + Vaizel's Authority + Supporting FireThe TW level-50 core, for planning.
2.3 Stigma overview, Global and TW
| Essential | Bow of Blessing · buff |
|
| Essential |  Supporting Fire · buff Supporting Fire · buff |
|
| Essential | Vaizel's Authority · buff |
|
| Situational | Explosive Arrow · damage / break |
|
| Situational | Griffon Arrow · damage / break |
|
| Situational | Mother Nature's Breath · survivability |
|
| Situational |  Ambush Kick · survivability Ambush Kick · survivability |
|
| Situational | Arrow Storm · break |
|
| Skip |  Stealth Stealth |
|
| Skip |  Sealing Arrow Sealing Arrow |
|
| Skip |  Assault Smite Assault Smite |
|
| Skip |  Ensnaring Trap Ensnaring Trap |
Chapter 3 · PvE rotation and macro
Credit for the macro setup goes to JOEI.
3.1 Skill chains
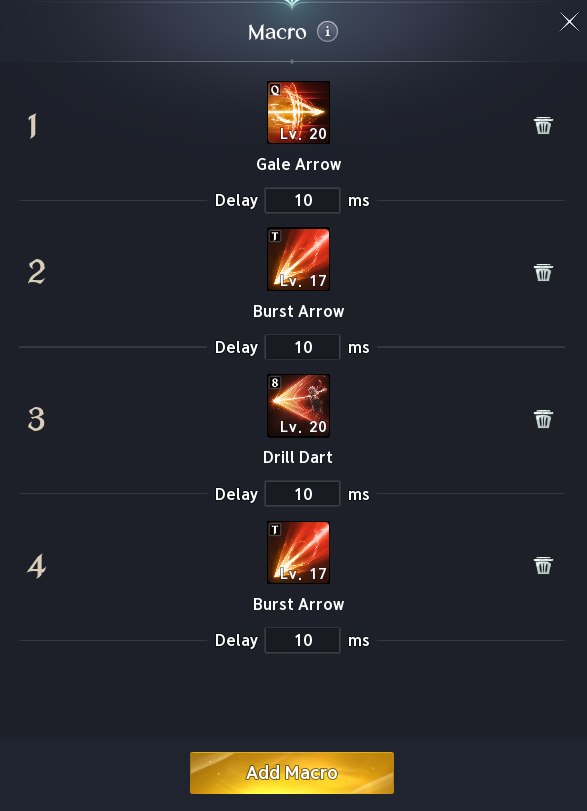
Build the skill chains once you have all the skills. The macro is built around the best damage performance, but macros change frequently with balance patches and skill changes, so expect this to be updated often.
Marking Shot, Scattershot, Suppressing Arrow, Explosion Trap and Mother Nature are NOT part of the macro.
Marking Shot does not need to be spammed. It wastes animations and currently griefs you with forced jump animations that can lead to deaths; it is better to track the buff manually and only use it to keep it up.
Mother Nature is a survival skill and would not be up at the right time inside a macro. Suppressing Arrow is not used at all. Explosion Trap is situational for AoE and grouping.
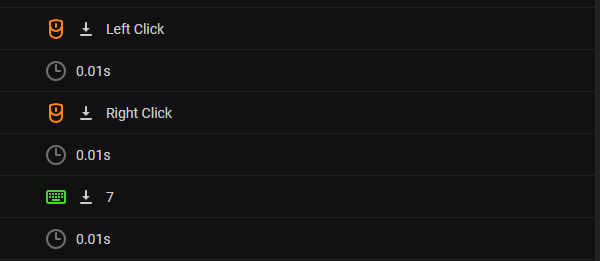
The chain, and the loop that drives it
In-game macro, Key Settings → General → Gameplay → Macro.
- Gale Arrow 10 ms
- Burst Arrow 10 ms
- Drill Dart 10 ms
- Burst Arrow 10 ms
Razer loop, set to run while the button is held and stop on release.
- Left Click: Snipe 10 ms
- Right Click: in-game macro key 10 ms
- 7: Deadshot 10 ms
3.2–3.3 Macro setup
Snipe
Deadshot
Set the in-game macro up and paste in your skill chains, then pair it with macro software. I use Razer, as does JOEI. It is important that the macro is set to run while the button is held and stop once released. If you use different software you will need to work out the equivalent setting yourself.
Macro FAQ
Why do we need a 3rd party? Can't we just use the in-game macro as a standalone?
In theory yes, but the in-game macro will not use 3rd-stage Deadshot, which leads to a huge damage loss.
Is this bannable?
No, as long as you are not building a macro that can run automatically, which is botting. Held-button macros are totally fine.
Isn't it suboptimal to run buffs inside the macro?
Not really, since we run boss to boss in most cases. It is also no issue to remove buffs from the macro and use them manually for more control. Try it and decide for yourself. Good to know: through the -1s cooldown trait from Vaizel's you will later hold it at 100% uptime at certain Combat Speed and CDR values. The same applies to Supporting Fire, and to Bow of Blessing, although that takes higher values since its base cooldown is longer.
How do I use the macro for sustain farming?
Use a second preset without the Deadshot line and Marking Shot line. Or just hold the in-game macro key instead of the Razer one, so Deadshot and LMB are not used.
Chapter 4 · Daevanion boards
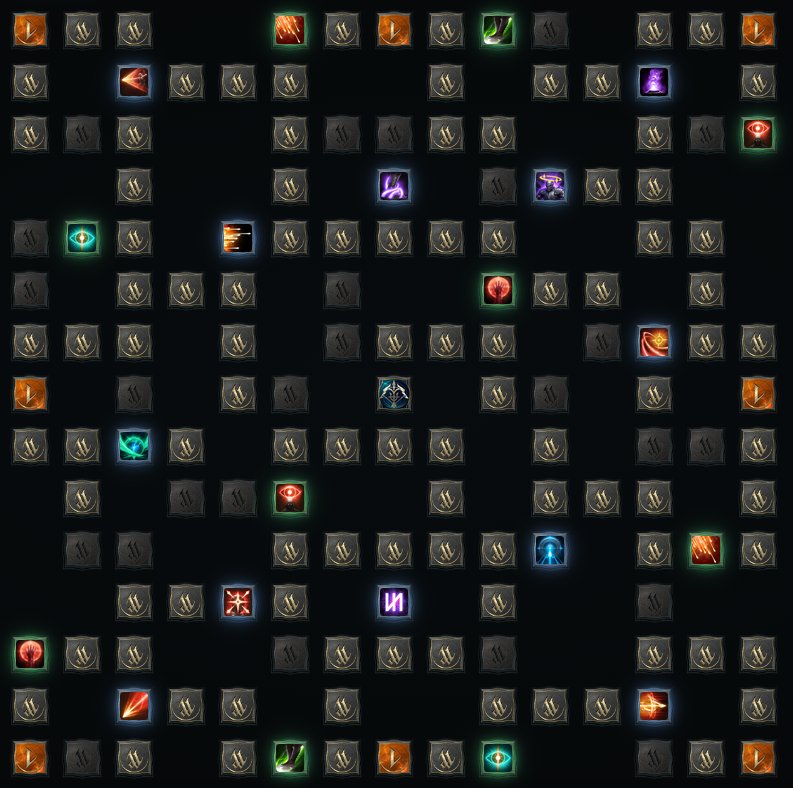
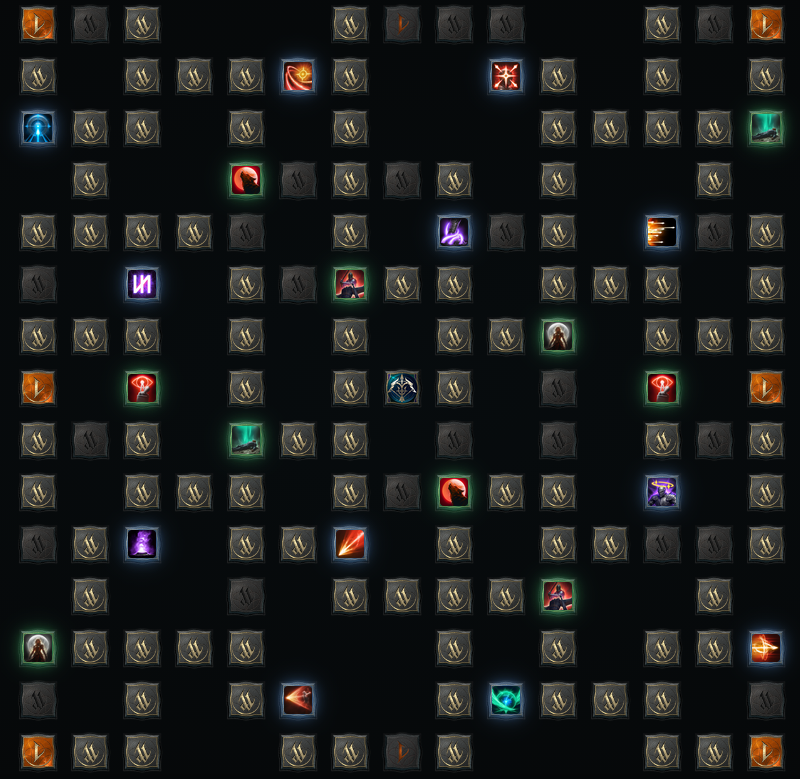
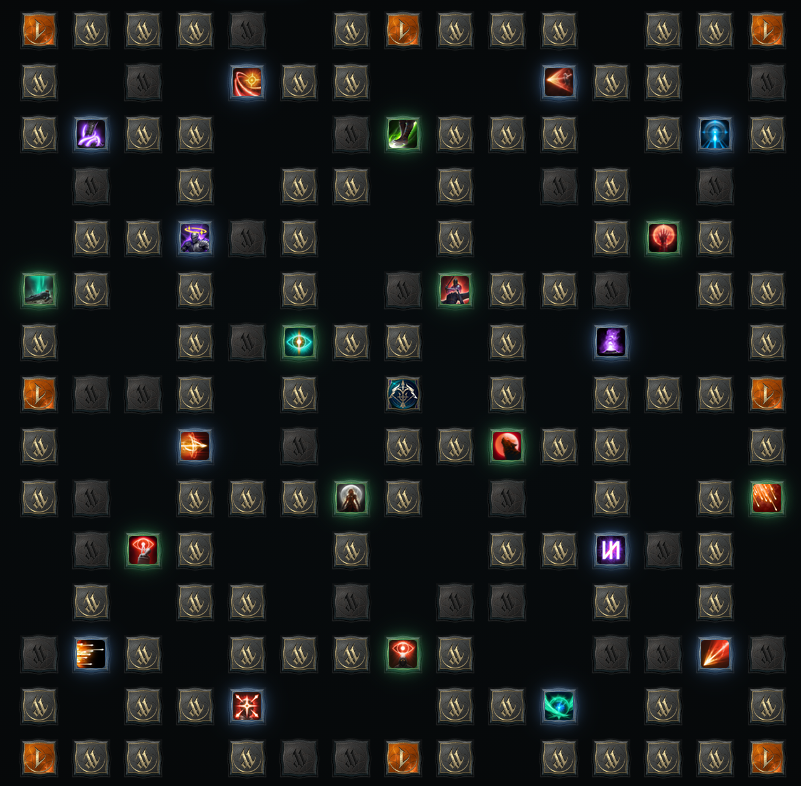
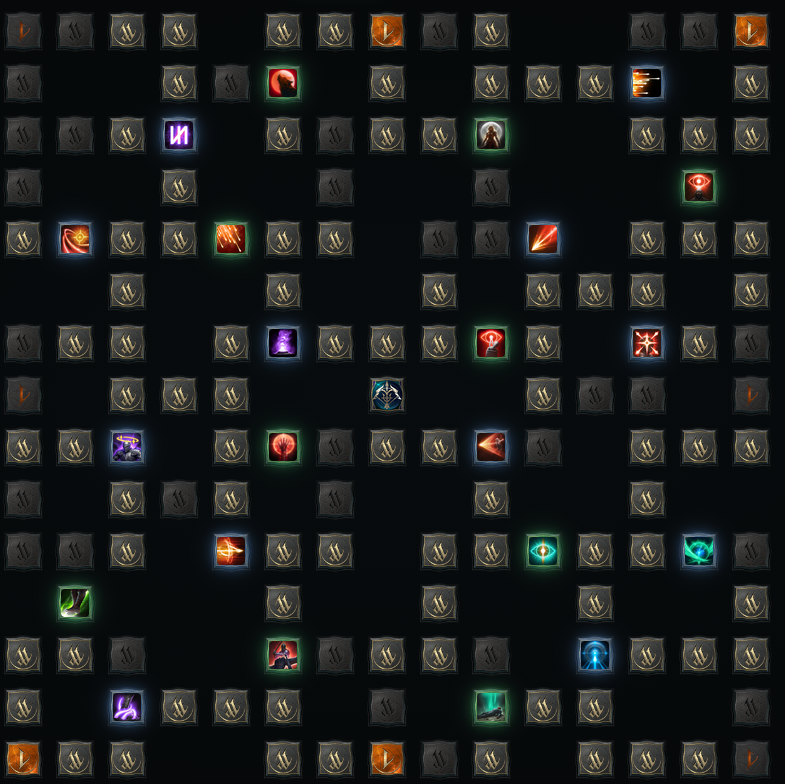
- Start with the top-priority skills and passives (Chapter 1) and work through until you have most of them.
- Sometimes take Blue over Orange, if it lets you hit an active-skill milestone at Lv 8, 12, 16 or 20.
- The board is a marathon, not a sprint. All boards after the first four can be fully maxed and do not appear here.
- On TW the four boards grew with the level 50 patch. If Global differs I will update them.
If you cannot max a board, spend nothing on tiles that do not give offensive attributes. Defence is considered less important.
Chapter 5 · Pets
Four types: Cogni, Fera, Natura, Varian. Pets give a lot of flat stats and are important.
Level priority: Cogni > Fera > Natura > Varian.
5.1 At Global release
GlobalFocus armour over pets at launch. Pets come with time and from the daily dungeon. Do not sink early resources here; gear carries you further in the first weeks. Only use Rainbow Crystals for Special Genus Insight. Current information says pets will cap at level 3 on Global.
5.2 Genus Insight
Check in game which slot can reroll which attributes.
Get slots 3, 6 and 9 first, then reroll the other slots based on what you are missing. Do not lock slots until level 10, except 3/6/9. If you get a Smite or Tolerance roll of 1.7% or higher, that is worth keeping in your first preset. Afterwards work on a second set aiming for 2%+.
On TW people currently go for a mix of front damage % and Smite. I would not recommend rolling more than 2 lines (3 and 9) with it, since the idea of front damage being better than Smite is linked to already-high Smite values from other sources that we will not have until Season 3, Chapter 1, 8 to 9 months after launch. Positioning is also insanely important; if you do it wrong you will not benefit from the front damage % at all. That said, if you can keep your positioning up it is a good overall damage gain.
TL;DR: a very good player uses front damage at certain Smite values to maximise damage. If you are more casual and do not want to stress about positioning, go full Smite and have a relaxed life.
In the end, if you die inside a dungeon because of damage greed, you are griefing far more than if you did a bit less damage.
Chapter 6 · Gear and stats
I do not recommend min-maxing anything except PvE crafted gear. I am not to be blamed for materials or money wasted on gear that is not worth it; if you are not sure whether to upgrade something, ask first.
This chapter focuses on the best PvE rolls for every gear piece to reach the best end result in terms of DPS. Every piece has a priority order, because different tiers of gear carry different numbers of lines.
PvE crafted gear is considered the best gear: it gives % PvE damage and tolerance and more stat lines than any other gear, so build toward it as soon as possible to transition out of dungeon gear.
Crafted gear, in this order
- Rings
- Earrings
- Necklace
- Bow
- Guard
- Chestplate
- Pauldrons
- Gloves
- Legs
- Boots
- Everything else
6.1 Equipment and Soul Binding

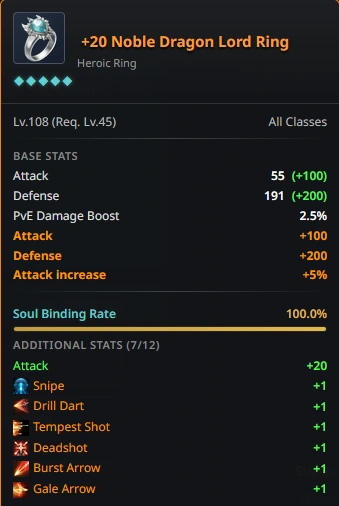
- 1 Snipe
- 2 Tempest Shot
- 3 Gale Arrow
- 4 Deadshot
- 5 Drill Dart
- 6 Burst Arrow
- 7 Attack

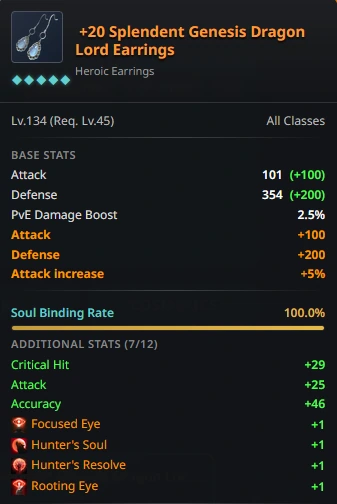
- 1 Focused Eye
- 2 Hunter's Resolve
- 3 Hunter's Soul
- 4 Accuracy
- 5 Crit
- 6 Attack

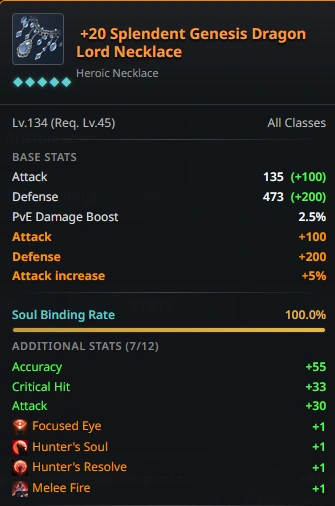
- 1 Focused Eye
- 2 Hunter's Resolve
- 3 Hunter's Soul
- 4 Accuracy
- 5 Crit
- 6 Attack

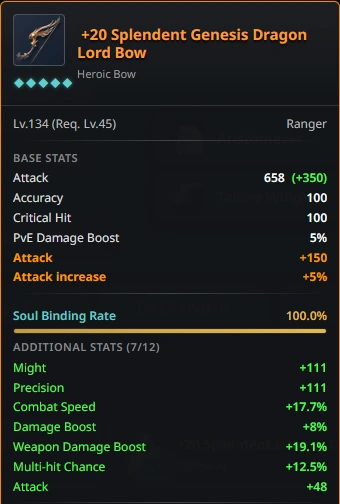
- 1 Weapon Damage Boost
- 2 Combat Speed
- 3 Might
- 4 Precision
- 5 Damage Boost
- 6 Multi Hit Chance
- 7 Attack

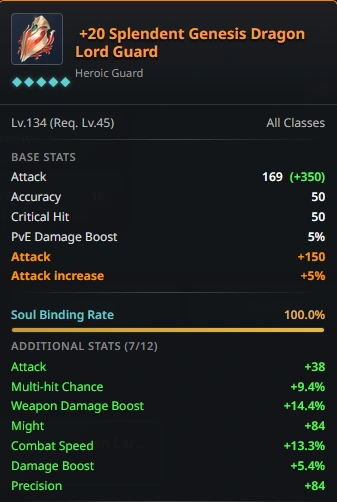
- 1 Weapon Damage Boost
- 2 Combat Speed
- 3 Damage Boost
- 4 Might
- 5 Precision
- 6 Multi Hit Chance
- 7 Attack

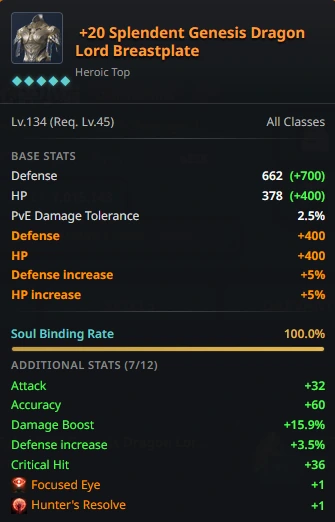
- 1 Damage Boost
- 2 Focused Eye
- 3 Hunter's Resolve
- 4 Crit
- 5 Accuracy
- 6 Attack
- 7 Defense Increase

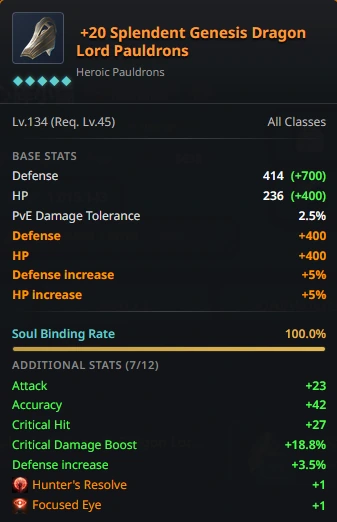
- 1 Critical Damage Boost
- 2 Focused Eye
- 3 Hunter's Resolve
- 4 Accuracy
- 5 Crit
- 6 Attack
- 7 Defense Increase

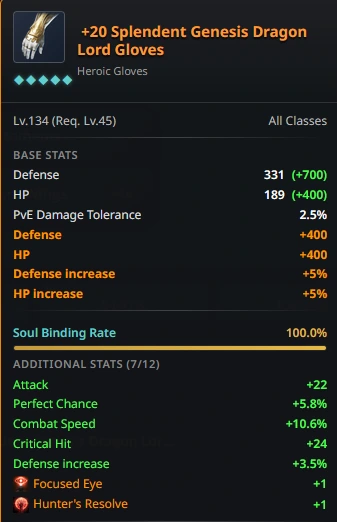
- 1 Combat Speed
- 2 Focused Eye
- 3 Hunter's Resolve
- 4 Perfect Chance
- 5 Crit
- 6 Attack
- 7 Defense Increase

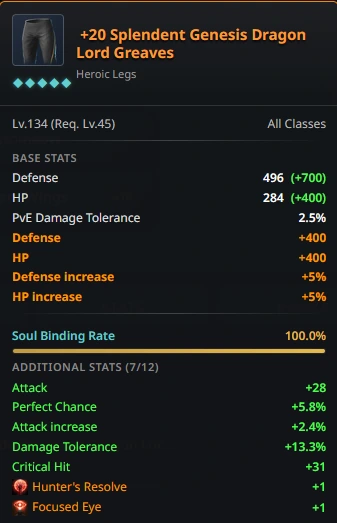
- 1 Damage Tolerance
- 2 Focused Eye
- 3 Hunter's Resolve
- 4 Perfect Chance
- 5 Attack Increase
- 6 Crit
- 7 Attack

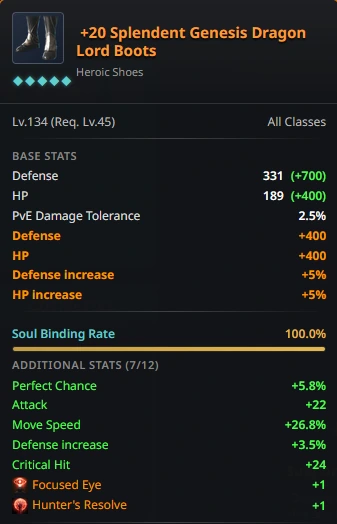
- 1 Move Speed
- 2 Focused Eye
- 3 Hunter's Resolve
- 4 Perfect Chance
- 5 Crit
- 6 Attack
- 7 Defense Increase

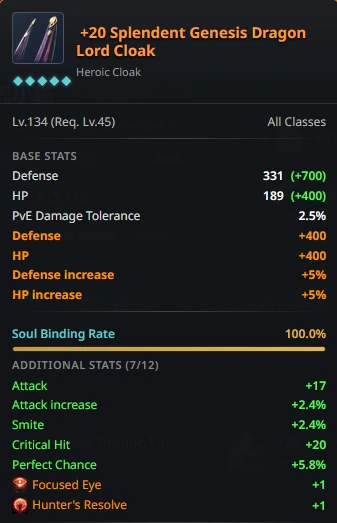
- 1 Focused Eye
- 2 Hunter's Resolve
- 3 Smite
- 4 Perfect Chance
- 5 Attack Increase
- 6 Crit
- 7 Attack

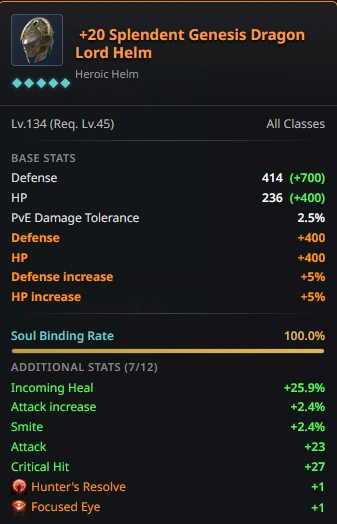
- 1 Incoming Heal
- 2 Focused Eye
- 3 Hunter's Resolve
- 4 Smite
- 5 Attack Increase
- 6 Crit
- 7 Attack

- 1 Wisdom [Lumiel]
- 2 Destruction [Zikel]
- 3 Time [Siel]
- 4 Illusion [Kaisinel]
- 5 Death [Triniel]
- 6 Justice [Nezekan]
- 7 Life [Yustiel]
- 8 Space [Israphel]
- 9 Freedom [Vaizel]
- 10 Destiny [Marchutan]

- 1 Might
- 2 Precision
- 3 Accuracy
- 4 Crit
- 5 Constitution
6.1.1 Amulet, Belt, Pendant, Clash Runes
You get both the Amulet and the Belt through world progression early on, and upgrade them by default until max. Nothing else to really say.
The Pendant is added with the Chapter 1 level-50 patch (not available at launch) and works the same way as the Belt and Amulet.
Clash Runes give fixed attributes based on the tier of amplification, but because of the high RNG in upgrading them it is not recommended to push higher than 6 or 7.
6.2 Base stats
Stats are divided into three categories: Divine Stats, Main Stats and Sup Stats.
Your main focus will be Attack, Crit and Accuracy for Main Stats, as well as Might and Precision. You will also focus heavily into Sup Stats. CDR and Combat Speed mostly come from Divine Stats and equipment Soul Binds.
Sup Stats
Example endgame distribution
| Stat | Value | Stat | Value |
|---|---|---|---|
| Might | 309 | Precision | 309 |
| Agility | 92 | Willpower | 107 |
| Constitution | 148 | Intelligence | 105 |
6.3 Divine Stats
Example endgame distribution
| Stat | Value | Stat | Value |
|---|---|---|---|
| Wisdom | 197 | Space | 93 |
| Destruction | 170 | Life | 89 |
| Time | 165 | Freedom | 73 |
| Death | 143 | Justice | 70 |
| Illusion | 117 | Destiny | 68 |
6.4 Theostones
Choose whatever. Theostones have 0 impact in PvE. There are some that are nice for PvP though, Silence for example.
6.5 Soulstones and Manastones
Soulstones and Manastones work exactly the same. Manastones are used for armour and weapons; Soulstones for accessories. You have many options. On end gear you want 2 gold lines on each piece: either 2× +100, or 1× +100 plus Attack.

6.6 Wings
Wings can be enchanted until +10. It is not your first priority, and I am not sure this will be in right at the Global release. You need to enhance all wings anyway for the current best Attack title.
Focus on what gives you the most value. Nightmare wings at +10 give a flat 2% more Smite just for owning them.
Wing progression timeline (equipped)
-

 Forest Spirit Wings / Dark Veil Wings
-
 Dead Ego Wings / Nightmare Wings
- Talisra Wings
- Eroded Golden Wings ★ Best in slot
6.7 Titles
Only showing best in slot plus the filler you use until you get best in slot. Nothing more to say.
Attack title
| 1 | Playing God ★ Best in slot PvE Damage Boost 5.5%, Smite 4%, Accuracy Bonus 90 · collection bonus: Flight Speed 1% | |
| 2 | Unbound by Genus PvE Damage Boost 5.5%, Attack Bonus 30, Critical Hit 80 · collection bonus: PvE Damage Boost 1% | |
| 3 | Guardian of Verteron PvE Damage Boost 3.7%, Smite 2% · collection bonus: PvE Damage Boost 1% |
Defense title
| 1 | Rule All Creation ★ Best in slot Defense Bonus 300, Back Attack Damage Tolerance 5.5%, Boss Damage Tolerance 6% · collection bonus: Move Speed 1% | |
| 2 | Saint of Verteron Defense Bonus 300, Damage Tolerance 5%, Block 110 · collection bonus: PvE Damage Tolerance 1% |
Special title
| 1 | Empty Closet ★ Best in slot Combat Speed 5%, Natural HP Regen 40, Cooldown Reduction 5% · collection bonus: HP 50 | |
| 2 | Through Hell and Back Cooldown Reduction 5%, HP 800, Stamina 200 · collection bonus: Block 10 |
Chapter 7 · Arcanas
Stats on Arcanas are random and need a lot of luck, so even a top player is not always running perfect Arcanas. Through the transmute preview you can always see which skills you can get on which Arcana.
Every Arcana card can be upgraded from 0 up to +5, and the higher the enhancement level the more expensive it becomes. With every enhancement level a random stat or skill line is upgraded.
My recommendation is therefore not to +5 every Arcana, but to go to +1 or +2 and check whether the stats you want are the ones going up. If not, try again on a different Arcana.
7.1 At Global release
GlobalChalice of Vigor
Parchment of Vigor
Compass of Magic
Bell of Magic
Mirror of Magic
Global starts with 5 Arcana slots and only very limited ways of building; the marked skills above are the priority.
On the Grail you can basically get any skill, so in some cases Deadshot or Gale Arrow might be the better fit there, as well as other skills that get you to +20. Overall Tempest Shot, Gale Arrow, Deadshot and Drill Dart are the skills that definitely should be at +20, they deal the most of your damage.
It is important to run the correct sets as shown, since different types of Arcanas give different Divine Stats.
Chapter 8 · Pantheon
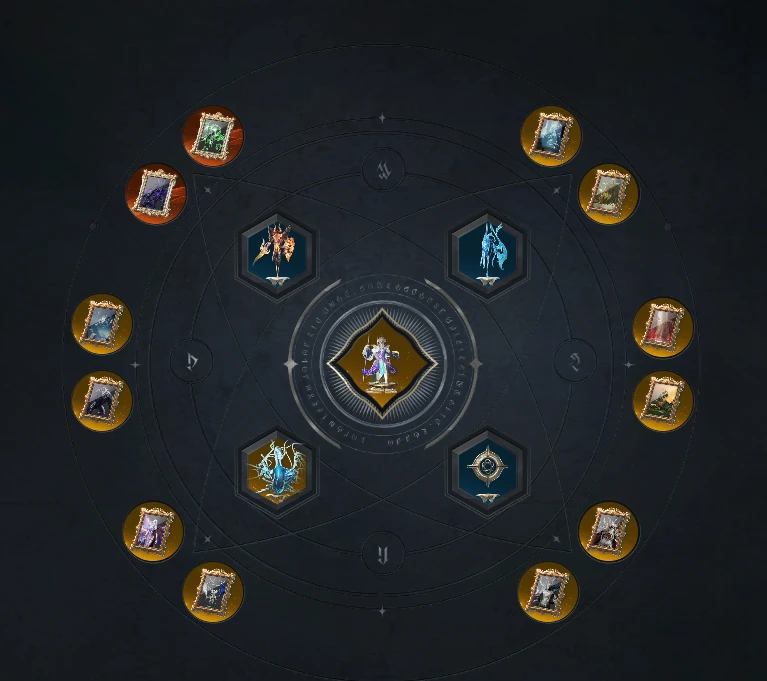
There are three different types of thing you can place: Artworks, Statues and Colossus. Depending on the rarity you get different amounts of stat lines, which is why you aim for Yellow/Orange long term.
Artworks, Statues and Colossus
You aim for Illusion + Wisdom. The third stat is most of the time Destiny or Life; Life is better.
Early on you use blue as filler with only 2 lines.
Everything else is considered no option.
Changelog
| 2026-09-06 | Added a disclaimer about the Season 1 skill setup in Chapter 1. |
| 2026-09-03 | Chapter 7 Arcanas reworked; Season 2 and beyond removed to keep the guide aimed at Global. Skill table reworked to include the Broken tier. |
| 2026-08-31 | Chapter 6 fully reworked; Chapter 8 Pantheon and the Titles section added. |
| 2026-08-28 | Chapter 3 added: macros, skill chains, macro setup. Credit to JOEI for the macro. |
| 2026-08-26 | Changelog started. Griffon Arrow added to the good Break Value category, overlooked it. |
Community guides. Fan project, not affiliated with NCSOFT.